What is the printing angle adjustment of The Pad Printers?
Jan 02, 2026
Pad printing is a versatile printing process widely used in various industries for applying images, logos, and text onto different types of surfaces. As a leading supplier of The Pad Printers, we understand the importance of every aspect of the pad printing process, especially the printing angle adjustment. In this blog post, we will delve into what the printing angle adjustment of pad printers is, why it matters, and how it can impact the quality of your prints.
Understanding the Basics of Pad Printing
Before we dive into the details of printing angle adjustment, let's briefly review the basic principles of pad printing. Pad printing is a form of indirect offset printing that uses a silicone pad to transfer an inked image from a cliche (a printing plate) onto a substrate. The process involves several steps:
- Inking: The cliche is filled with ink, and a doctor blade removes the excess ink, leaving only the ink in the engraved areas of the cliche.
- Transfer: The silicone pad descends onto the cliche, picks up the inked image, and then transfers it onto the substrate.
- Printing: The pad presses the inked image onto the substrate, creating the final print.
What is Printing Angle Adjustment?
Printing angle adjustment refers to the ability to change the angle at which the silicone pad makes contact with the substrate during the printing process. This adjustment can be made in both the horizontal and vertical planes, allowing for precise control over the transfer of the inked image. The printing angle can have a significant impact on the quality, clarity, and consistency of the printed image.
Horizontal Angle Adjustment
Horizontal angle adjustment involves tilting the pad in the left or right direction. This adjustment is particularly useful when printing on curved or irregularly shaped surfaces. By adjusting the horizontal angle, you can ensure that the pad makes even contact with the substrate, resulting in a more uniform print. For example, when printing on a cylindrical object, such as a pen or a bottle, adjusting the horizontal angle can help to wrap the image around the curve smoothly.
Vertical Angle Adjustment
Vertical angle adjustment, on the other hand, involves tilting the pad in the forward or backward direction. This adjustment is crucial for controlling the amount of pressure applied to the substrate during the printing process. By adjusting the vertical angle, you can ensure that the pad applies the right amount of pressure to transfer the ink effectively without smudging or distorting the image. For instance, when printing on a soft or delicate surface, such as a rubber or plastic part, adjusting the vertical angle can help to prevent overprinting or damage to the substrate.
Why is Printing Angle Adjustment Important?
Printing angle adjustment plays a vital role in achieving high-quality prints in pad printing. Here are some of the key reasons why it is important:
- Improved Print Quality: By adjusting the printing angle, you can ensure that the pad makes even contact with the substrate, resulting in a more uniform and consistent print. This can help to eliminate issues such as smudging, blurring, and uneven ink transfer, leading to sharper, clearer, and more professional-looking prints.
- Enhanced Versatility: Printing angle adjustment allows you to print on a wide range of surfaces, including curved, irregular, and textured surfaces. This makes pad printing a highly versatile printing process that can be used in various industries, such as automotive, electronics, medical, and consumer goods.
- Increased Efficiency: By optimizing the printing angle, you can reduce the number of rejects and reprints, saving time and money in the production process. This can help to improve the overall efficiency and productivity of your printing operation.
- Better Adhesion: Adjusting the printing angle can also help to improve the adhesion of the ink to the substrate. By applying the right amount of pressure and ensuring proper contact between the pad and the substrate, you can ensure that the ink adheres firmly to the surface, resulting in a more durable and long-lasting print.
How to Adjust the Printing Angle
Most modern Industrial Pad Printing Machines are equipped with adjustable printing angles, allowing for easy and precise control over the printing process. Here are the general steps for adjusting the printing angle:
- Prepare the Machine: Before making any adjustments, make sure that the machine is turned off and the power is disconnected. This will help to prevent any accidents or injuries during the adjustment process.
- Locate the Adjustment Controls: Depending on the model of your pad printer, the adjustment controls for the printing angle may be located on the machine's control panel or on the pad printing head itself. Refer to the machine's user manual for specific instructions on how to locate and access the adjustment controls.
- Make the Adjustment: Once you have located the adjustment controls, you can use them to adjust the printing angle in the horizontal and vertical planes. Start by making small adjustments and test the print quality after each adjustment. Continue making adjustments until you achieve the desired print quality.
- Test the Print: After making the adjustment, run a test print on a sample substrate to check the quality of the print. If necessary, make further adjustments to the printing angle until you are satisfied with the results.
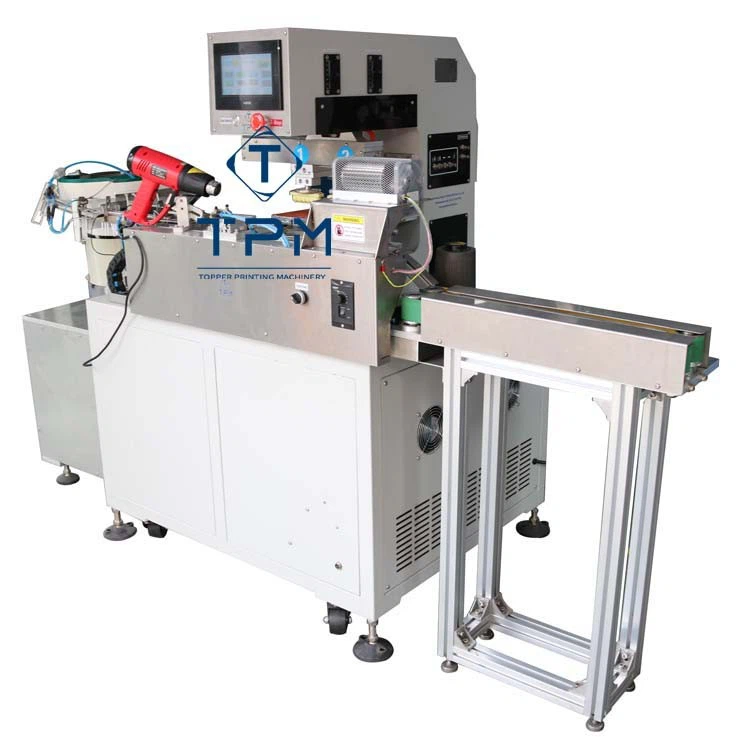
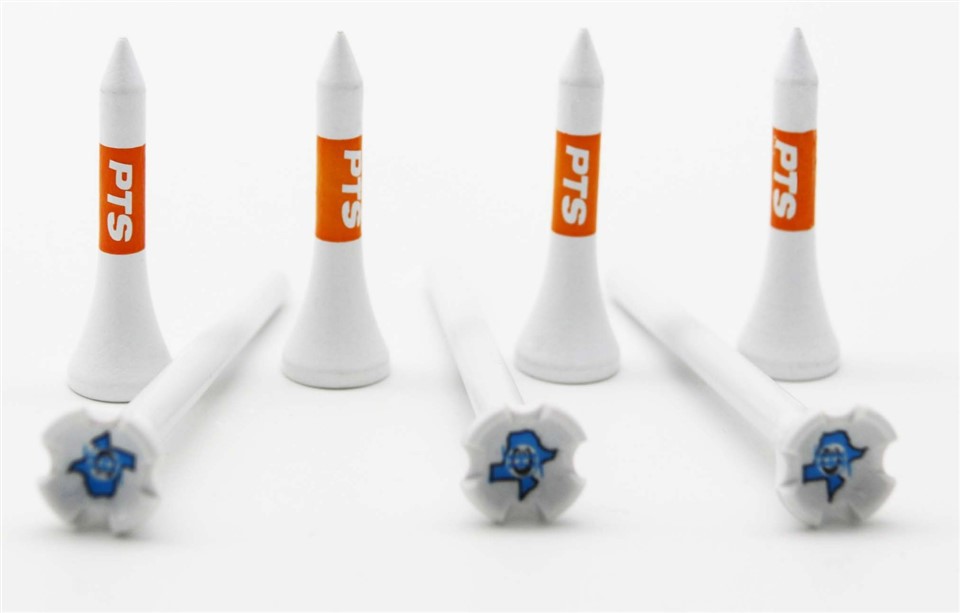
Case Study: Printing on Golf Tees
To illustrate the importance of printing angle adjustment, let's consider a case study of printing on golf tees using a Golf Tee Pad Printing Machine Automatic. Golf tees are small, cylindrical objects with a tapered end, making them a challenging surface to print on. By adjusting the printing angle, we were able to achieve high-quality, consistent prints on the golf tees.
Step 1: Initial Setup
We started by setting up the golf tee pad printing machine according to the manufacturer's instructions. We loaded the cliche with the desired image and adjusted the ink volume and pressure settings. We also positioned the golf tees on the machine's fixture to ensure proper alignment.
Step 2: Printing Angle Adjustment
Next, we adjusted the printing angle to ensure that the pad made even contact with the surface of the golf tees. We started by making small adjustments to the horizontal angle, tilting the pad slightly to the left and right to find the optimal angle for printing on the curved surface. We then adjusted the vertical angle to ensure that the pad applied the right amount of pressure to transfer the ink effectively without smudging or distorting the image.
Step 3: Printing Test
After making the adjustments, we ran a test print on a sample golf tee. We were pleased to see that the print quality was excellent, with sharp, clear images and even ink transfer. We then printed a batch of golf tees and were able to achieve consistent results throughout the production run.
Conclusion
Printing angle adjustment is a critical aspect of the pad printing process that can have a significant impact on the quality, clarity, and consistency of the printed image. By understanding what printing angle adjustment is, why it is important, and how to make the adjustment, you can optimize your pad printing operation and achieve high-quality prints on a wide range of surfaces.
As a leading supplier of The Pad Printers, we offer a wide range of industrial pad printing machines and accessories that are designed to meet the needs of various industries. Our machines are equipped with advanced features, such as adjustable printing angles, to ensure precise control over the printing process. If you are interested in learning more about our products or have any questions about pad printing, please contact us to discuss your specific requirements. We look forward to working with you to achieve your printing goals.
References
- Pad Printing Technology Handbook, 3rd Edition, by Michael M. Carano
- Industrial Printing Processes: Principles, Techniques, and Applications, by R. John Kipphan